
 By
By 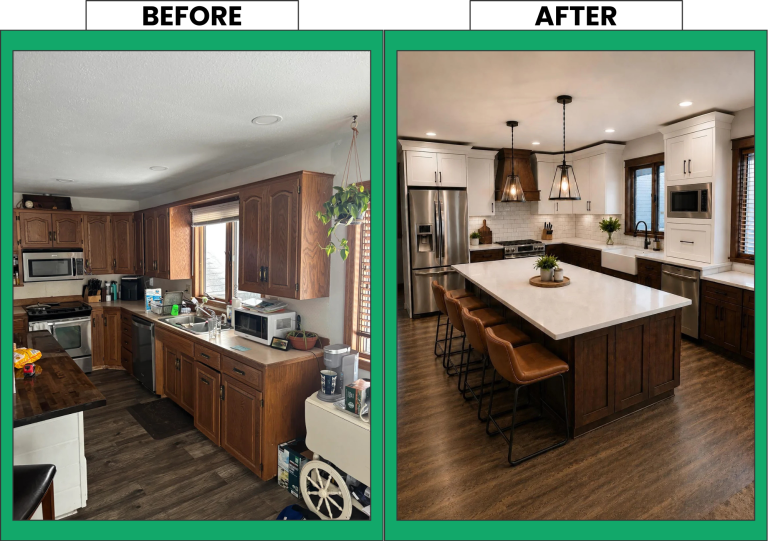
In home remodeling, trust is everything. And there is one type of post that stops a homeowner mid-scroll and does the selling for you, without a single line of clever copy: the before-and-after.
It shows a homeowner exactly what is possible in their own space while they are already picturing their own kitchen or bathroom in its place. This post covers why it works, how to shoot one that actually lands, and how to post it so it gets seen.
Why The Before-And-After Sells Without Selling
The human brain is wired to react to change and contrast. When a homeowner sees the “before” next to the “after,” their brain immediately grasps the value of the work, no explanation required. They see the end result of their own potential project in a single glance.
There is a reason a great photo outsells great copy. An MIT study published in 2024 mapped what happens in the brain when we see a memorable image. The researchers found that a memorable image produces a distinct brain signature about 300 milliseconds after you see it, and that memorable images hold the brain’s attention for roughly half a second while forgettable ones fade almost as quickly as they appear. A strong before-and-after is built to be one of those images that sticks. Whether it is a dated kitchen brought back with new countertops and cabinets or a tired bathroom reborn in fresh tile and stone, the contrast does the work your captions cannot.
It also delivers the one thing every homeowner is looking for before they call: proof. A before-and-after shows that you have actually done the work, that real people have trusted you, and that the results hold up. In video form it travels even further, getting shared across Instagram and TikTok where your next customer is already scrolling. Most homeowners check your online presence before they ever pick up the phone, and this is the content that earns the call.
How To Shoot One That Actually Works
Capture the “before” before you start. It sounds obvious, but it is the step most crews forget, and you only get one chance at it. The reason it gets missed is simple: on day one everyone is focused on the work itself, the demo, the measurements, the prep, and the space is at its least impressive, so documenting it is the last thing on anyone’s mind. But that plain, unflattering “before” is the half of the story that makes the “after” land. Make the first shot a habit on day one of every job.
Shoot the before and the after from the same angle, the same height, and in the same light, so the only thing that changes in the frame is your work. A new floor or a refreshed kitchen reads instantly when the camera position holds steady and the result is the only thing that moves. For homeowners, that consistency reads as trust. A simple phone stabilizer helps keep your shots steady and lined up from one visit to the next, and none of this needs a big production budget. The phone in your pocket is more than good enough.
This is also where Project Perks does the remembering for you. The employees who are already on site capturing the job can store every photo and video straight in your Project Perks library, so the content is there waiting when it is time to post.
How you frame the shot matters as much as the gear. A separate MIT study on what makes images stick found that the most memorable ones share three traits: bright colors, a simple background, and the subject centered in the frame. That is almost a shot list for a before-and-after. Keep the space well lit, clear the clutter, and put the finished work dead center.
How To Post It So It Actually Gets Seen
Standing out in a market as crowded as home remodeling takes a little effort, and it matters more than ever. Right now the best-performing format on social is video. It is what Facebook and Instagram users interact with most, and short-form video in particular earns the widest reach of any content type on those platforms. A quick 15 to 20 second before-and-after will usually outperform a single still. That is how homeowners browse for their next project, and how they decide who to hire.
Carousels are the next best format. They give your post a second chance in the feed by resurfacing for people who only saw the first image, which makes them a natural fit for a before-and-after reveal.
Where The Real Work Is
The before-and-after is not hard because it is complicated. It is hard because someone has to remember to take the shot and actually get it posted between jobs. That is exactly the friction Project Perks removes. The photos your crew already takes on site become ready-to-post before-and-afters, captioned and scheduled, so your best proof actually makes it out the door instead of sitting in someone’s camera roll. The same content can feed your next campaign too, whether you run it yourself or have us handle it for you. Join our waitlist or schedule a call to find out how we can help your business.